I participate in several powerlifting forums and one of the ever-controversial topics that has come up quite a bit lately is high bar vs. low bar squats. Opinions range from “anything can work, just gotta find what works for you, brah” (the powerlifting broscientist) to “low bar is universally better for every single application, ever” (the powerlifting fascist). I tend to be somewhere in the middle, but, despite the fact I’ve already articulated my thoughts on bar position in my huge squat article, let’s hone in on this one specific piece of squat technique.
To be clear, I’m going to draw heavily upon many biomechanical principles to make this argument. If you enjoy this type of thing, I cannot recommend that you pick up a copy of Starting Strength more strongly. This is the only book that I’m aware of that offers an actual biomechanical analysis of all the powerlifts (and a few others).
Powerlifting Technique Analysis
Whenever I’m evaluating the effectiveness of a powerlifting technique, I like to go beyond merely observing what the top guys are doing. Many people don’t seem to consider that athletes can become very, very good using inefficient techniques. A casual glance at any sport will reveal this is the case. Plenty of pro basketball players have flawed jump shots, not everyone has a swing like Robinson Cano in the MLB, and comparing NFL QBs’ throwing mechanics will easily demonstrate that some are much more proficient than others.
Here’s Shawn Marion showing you one of the most bizarre free throw strokes in NBA history:
Why anyone thinks this whole scenario plays out differently in powerlifting is really beyond me; it absolutely doesn’t. Let me be clear: with great genetics and a lifetime of hard training, you can easily overcome inefficient techniques in powerlifting. But why put yourself at that disadvantage? Rather than rely on tradition or copycat maneuvers, let’s analyze our powerlifting technique through the lens of biomechanics. Let’s actually use some science.
There are many important mechanical factors to consider in an analysis of powerlifting technique: range of motion, “leverage” on the system, joint angles at the positions of greatest inefficiency (mechanical advantage), total muscle mass used, the relative distribution of load amongst the various muscle groups, and many more. In order to get an accurate picture of “low bar” vs. “high bar”, we really need to discuss the vast majority of these factors.
High Bar vs. Low Bar
First, let’s talk about what the actual difference is between the high bar and low bar squat. The reality is that the low bar squat puts the bar about 3-4” lower on the back right above the spine of the scapula just above the rear deltoids. The high bar back squat places the bar on top of the trapezius muscles. What’s the effect of the different position? The low bar back squat produces an effectively shorter torso than the high bar back squat. More on that shortly.
Mid-Foot Balance Point
Before we can analyze the implications of a shorter vs. a longer torso, we need to talk about balance. Despite the fact that many coaches teach you need to “squat from your heels”, the human body balances directly over the middle of the foot. A system comes into a balance when it finds a point where the least effort is required to remain stable and/or a point where the most force is necessary to disturb the system. For our purposes, this is the middle of the foot because the middle of the foot is the point where there is an equal amount of foot to the back and to the front. Sorry to be pedantic, but if you were any closer to your toes, or any closer to your heels, it would be easier for you to be pushed in either direction.
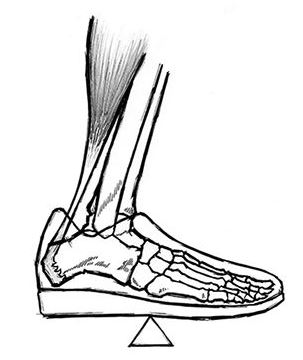
The mid-foot balance point. Photograph: Rippetoe, Mark (2012-01-13). Starting Strength (Kindle Location 377). The Aasgaard Company. Kindle Edition.
This fact is important because any time the lifter/barbell system comes out of balance, you create a moment arm between the balance point (the mid-foot) and the point of force application (the bar). This is why it is harder to pick up a deadlift when it is a foot in front of your toes, for example.
Moment Arms
Moment is the force that causes rotation about an axis. Think of a wrench trying to turn a bolt. The force transmitted down the handle is the moment force. Now, a moment arm is the length of that handle from the hand on the wrench (point of force application) when measuring at 90 degrees to the bolt (point of rotation/axis). The longer the handle, the easier it is to turn the bolt. We’ve all experienced that, right?
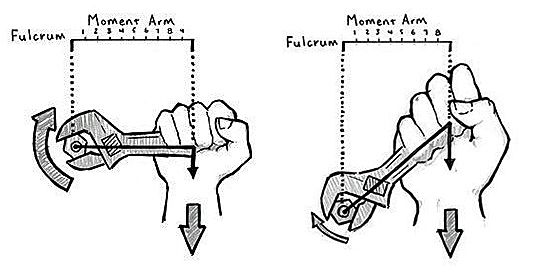
The longer the moment arm, the stronger the moment arm. Photograph: Mark Rippetoe. Starting Strength: Basic Barbell Training. Rev. 3rd ed. 2012.
Well, in the lifter/barbell system, the barbell is the hand on the wrench (point of force application), the distance between the barbell and the joints is the wrench handle (moment arm), and the joints are the pivot points (rotational axis). As such, we want to create the shortest possible moment arms, in terms of distance between the bar and our joints, to minimize the leverage we must overcome to complete a lift.
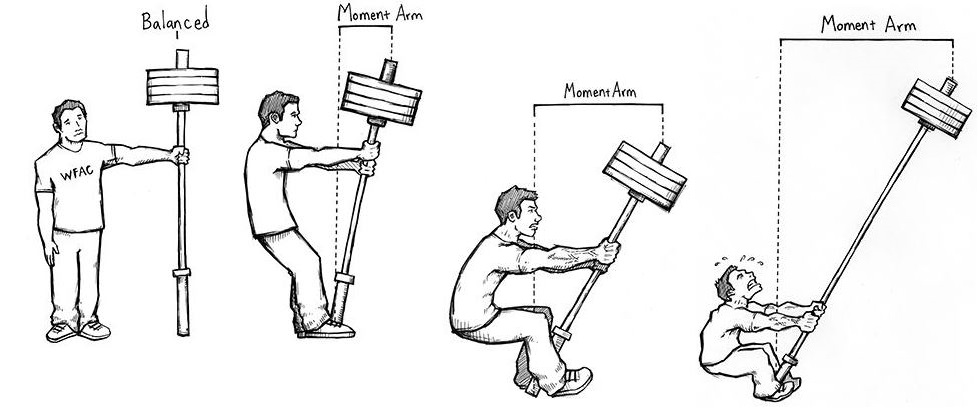
THIS is why you want to minimize moment arms. Photograph: Rippetoe, Mark (2012-01-13). Starting Strength (Kindle Location 958). The Aasgaard Company. Kindle Edition.
Front Squats vs. High Bar vs. Low Bar
Consider the moment arms of the following three positions: front squat, high bar squat, and low bar squat.
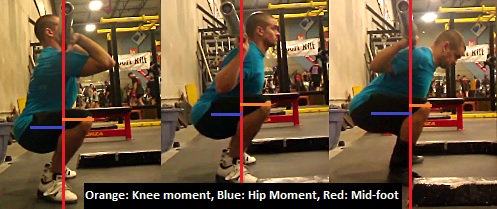
Note: I’m not very flexible otherwise the difference would be a bit greater between all three forms. Still, notice how as the back becomes more vertical, the knees are pushed further forward and knee moment is increased.
Of all three positions, the front squat actually requires the least forward lean to keep the bar over the middle of the foot. However, notice what this does to the moment arms involved in the movement. The moment arm between the hips and the bar is greatly shortened and the moment arm between the knees and the bar is greatly elongated. This essentially produces a squat that is relatively easy in terms of hip extension but extremely difficult in terms of knee extension. This is why the front squat has a reputation as a great quad builder.

Note the length of the moment arm between the knees and the bar and the length of the moment arm between the hips and the bar.
You’ll notice that low bar is somewhat the opposite. Most of the moment is shifted to the hips. High bar is somewhere in the middle. The implications here are that the low bar squat is a more hip dominant movement compared to either high bar squats or front squats.
Let’s break this down further. The longer a given moment arm between a joint and the bar, the more “leverage” that must be overcome by that joint to complete the lift. When the lever arm is longer between the knees and the bar, greater knee extension strength is required to complete the lift. And on the other hand, when the lever arms are shorter at the hips than at the knees, the hip extension portion of the movement will be easier and will thus require less hip extension strength. Hopefully it is now easier to understand why people refer to low bar as more “posterior chain dominant” and front squats as more “anterior chain dominant”.
Squat Back Angle
Now, let’s consider back angle. Of all three positions, the front squat is actually the most upright squatting position. This is actually necessary. If you don’t maintain your upright position, the bar simply falls off your shoulders. As such, the front squat forces you to use more quads. In fact, you will never miss a front squat due to overall weakness (for the most part), you will always miss a front squat because the weight got heavy enough that you simply HAD to recruit too much “hips” to finish the lift. The lift will always be dumped forward as a result.
Like this:
http://www.youtube.com/watch?v=KKQAUOGJuuY#t=0m7s
A lot of people don’t realize that high bar has a very similar effect. The high bar rack position is unstable. If you lean over too much, the bar rolls onto your neck and the lift is finished. You must maintain a certain degree of “uprightness” or the bar rolls.
Pete Rubish is one of my favorite lifters, but he is a good example of what this looks like:
This is simply not the case with a low bar squat. The low bar rack is highly stable. Though I’m not saying this is correct technique, it is entirely possible to finish a low bar squat with practically a good morning type back angle. When you squat low bar, you are not limited by torso angle; you are limited by strength.
Steve Goggins demonstrates a very bent over, very strong low bar squat:
Bringing It All Together
And this is really where the trade-off between high bar and low bar begins. The high bar rack position produces a longer torso. A longer torso means that you do not have to lean over so much to keep the bar over the middle of your foot. A longer torso means a shorter moment arm as seen between the hips and the bar and the knee and the bar.
The following picture demonstrates why lifters with long torsos often outperform their long femur counterparts in the squat:
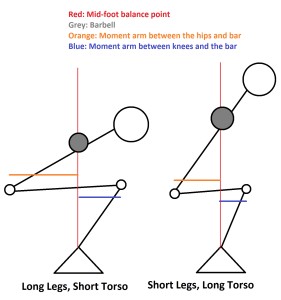
However, though the high bar position creates an effectively longer torso, the high bar position also REQUIRES an upright back angle which necessitates a certain degree of forward knee travel given a certain stance. There simply is no other way to keep your back upright when your stance is already locked in. More forward knee travel has two important implications for powerlifting technique: 1) a longer range of motion and 2) more leverage is shifted to the knees instead of the hips.
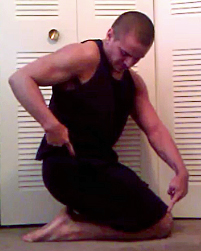
As you can see, I’ve squatted as low as is possible and I’m still no where near legal depth because of how far forward my knees have traveled.
If an upright back angle with maximum knee torque was the best way to squat for powerlifting, we’d all just front squat at meets. The reality is that there are other factors at play here. Remember, a longer range of motion means more work done against gravity because work is defined as force x distance. The anterior chain is simply not as big or as strong as the posterior chain. Shifting leverage preferentially to the anterior chain does not result in higher force production. Compare your front squat 1RM to your back squat 1RM if you want confirmation of this fact.
In a low bar squat, you can (almost) lean over as much as you feel like without worrying about losing the bar onto your neck, off your shoulders, or over your head. Leaning over a bit more allows us to do two things: 1) minimize knee forward knee travel and thus range of motion and 2) preferentially shift some of the leverage to the posterior chain instead of the anterior chain. Both of these things lead to more weight being lifted for reasons discussed in the preceding paragraph.
When to High Bar for Powerlifting
While I’ve really tried to keep this article (mostly) about bar position, I feel compelled to mentioned that producing “optimal” squat technique is really more of a balancing act than anything else. It is easy to get sucked into the extreme styles: 1) ZERO forward knee travel like a westside super wide stance squat or b) nearly totally upright like the perfect Olympic style back squat.
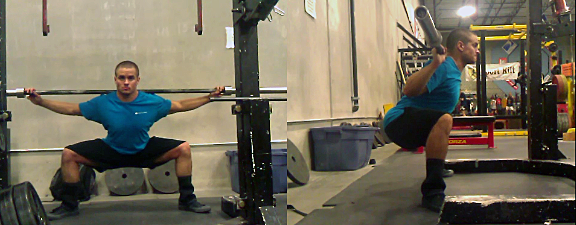
The Westside Style Squat: Notice how the Westside style squat basically eliminates forward knee travel. This makes the squat extremely, extremely hip dominant. Additionally, this is the shortest possible range of motion for a squat. The wide stance allows you to stay fairly upright even with the zero knee travel. Though it isn’t relevant to this article, the Westside style squat is worth consideration for competitors who are not held to IPF depth standards, who get to use a monolift, and who also have excellent hip health/flexibility.
Extremes aside, for the majority of people, the most effective raw powerlifting squat is going to fall somewhere in the middle and balance the following factors:
1) A non-vertical but fairly upright back angle; most of the best lifters have about ~55-65 degrees of trunk inclination in the hole.
2) A good balance between hip and knee moments; most of the best lifters have their knees within a few inches of their toes in the hole (either in front or behind).
3) The knees will be pushed “out” to better recruit the muscle mass of the hips and external rotators.
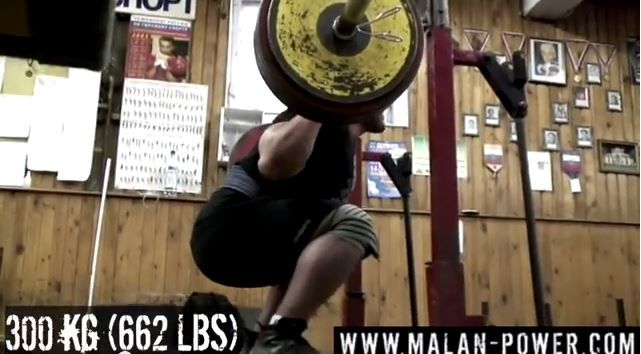
Note the knee travel and back angle of the greatest raw squatter to ever live: Andrey Malanichev. This is a very light weight for him; you’d expect slightly more trunk lean and slightly less forward knee travel at heavier weights.
Depending on your anthropometry (body proportions), hip flexibility, anatomy and health, shoulder flexibility, anatomy, and health, and individual muscular strengths and weaknesses (quad dominant vs. hip dominant), you’ll want to select a form that falls somewhere within this general range.
For example, you can produce a more upright back angle in all of the following ways: a) standing wider, b) pushing the knees out more, c) allowing the knees to track forward more, and d) using a higher bar position.

You can see that stance width, hip abduction (knees out), and foot angle all impact what the final product looks like.
If your hips are in really bad shape, and you have a short torso, you might NEED to use a high bar position to produce that somewhat upright trunk angle that is observed in nearly all elite squatters. Perhaps your hips just can’t handle a wider stance or more “knees out”. Likewise, perhaps your shoulders are in poor health or you have extreme elbow tendonitis. In that case, low bar is probably out of the question as well (at least until you heal your elbows).
An intelligent coach, or an intelligent lifter who self-coaches, will consider all of the variables that are part of the equation when optimizing technique for a given individual. These variables include stance width, foot position, bar position, knee travel, and hip abduction. Knowing the difference between a form fault and a form tweak due to individual differences is something that can only be earned with years and years in the trenches. Novice lifters often become very entrenched in their particular technical ideals and don’t realize how important nuance is to technical optimization. I have very often been guilty of this myself.
Once the lifter and coach find something that feels strong within the general model described above, the best practice is to stick to it and perfect the form over the course of 10+ years. This is, in my opinion, how technique optimization should be accomplished.
If you’d like more specific details on the process that I use to do this personally, as well as the squat technique that I recommend, read more here: http://www.powerliftingtowin.com/powerlifting-technique-squat-form .
In Conclusion…
In sum, low bar is nearly universally superior for powerlifting purposes because it preferentially shifts leverage to the hips, allows for less forward knee travel and thus a shorter range of motion, and it allows you to grind out weights without losing the lift due to an unstable rack position. There are exceptions of course, but they are called exceptions for a reason.
This is my low bar squat form. Note the back angle, knee travel, and bar position. In my opinion, this is a fairly balanced squat.
I said to start off the article, if you enjoy this type of biomechanical analysis, you’ll LOVE Starting Strength. The book contains over 300 pages of discussion that is exactly like this article.
Like this Article? Subscribe to our Newsletter!
If you liked this articled, and you want instant updates whenever we put out new content, including exclusive subscriber articles and videos, sign up to our Newsletter!
Questions? Comments?
For all business and personal coaching services related inqueries, please contact me:
[contact-form-7 id=”3245″ title=”Contact form 1″]



“When you squat low bar, you are not limited by torso angle; you are limited by strength.”
Perhaps one of the best arguments encountered online evre. Thanks!
A fine job you’re doing here with this blog. These are outstanding posts/videos.